This section deals in setting up your own dedicated server using Beryllium or your own Quake 3 Arena game
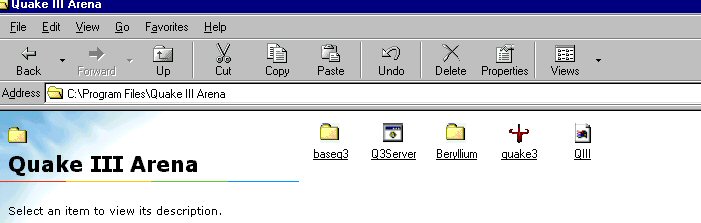
Running a dedicated server is quite simple 1nce you get everything set in place. The first thing you will need is the Beryllium MOD, you can get that in the MODS page here at psychossite. 1nce you have downloaded that all the contents will need to be extracted to your Quake 3 Arena folder. Before extracting go to your Quake 3 Arena folder and create a new folder and call it Beryllium. Then extract the contents of the zip file into the Beryllium folder which you just created. Now you should have a folder named Beryllium in your Quake 3 Arena folder that contains the beryllium files. YOU WILL NEED TO go into the Beryllium folder and cut and paste 1 file.. the Q3 Server.BAT file, the icon has a small little gear on it. CUT AND PASTE that into your Quake 3 Arena folder. The BAT file must be outside the Beryllium folder that you created. It should about look like this. The Q3Server is the BAT File and beside it is the Beryllium folder :)
If this is the way your Quake III Arena folder looks <without all the extras you might have added> then your on the right track. Now in order to run the beryllium configuration file you must set up the batch file. You can usually edit it by right clicking on the BAT file and then click edit, should open up in a Notepad. Now in the line that reads in the notepad, It should read somewhat like this
quake3.exe +set fs_game Beryllium Q3.qst +set dedicated 2 +exec beryllium.cfg +set sv_pure 0 +set bot_enable 0
A breakdown of each command is this:
quake3.exe = that executes the game console
set fs_game Beryllium Q3.qst = That is the beryllium info file
set dedicated 2 = This is an option for connection to the master server, there are 3 different selections you can choose form. 0 being you run it form your system without any outside influence as far as a master server. 1 being a local game, which you can run on your local network, via router or whathaveya. and 2 being when you start the server it sends out a linkup signal to master.quake3arena.com and therefore your game is listed on the net for all to connect too.
exec beryllium.cfg = This is the file that contains all the variables in the game. You can change all the settings in the cfg file but some are abit more sophisticated and require that you have good working knowledge of the MOD itself. I will get into detail about the cfg file in abit.
set sv_pure = This option only allows put side players whom are trying to connect, there config's must match your own in order to link up, also custom skins and models will not work in a pure server. All the default models will though. Now if you set a sv_pure 0 then all is welcome, along with custom settings skins models and whathaveya.! I run a sv_pure 0 server. More enjoyable that way.
set bot_enable = 0 will not run bots on your server. 1 will set it to run bots in you're server. <NOTE> YOU WILL NEED THE QUAKE 3 ARENA DISK IN THE CD DRIVE TO RUN BOTS IN YOURE SERVER.!>
Now that we have covered the BAT file setup, lets move on to the beryllium.cfg file. Now this is how a beryllium.cfg file looks like.
Now most of the top portion you should edit before running the server. your g_motd will display your message when they enter the server. Your be_motd is the message of the day. If you have a website you can display that as the message of the day, as I do in my server. NOW it is kind of important that you set an rconpassword in this cfg file. That way while your in the game you can change settings from within the game server. So while your in the game you type /rcon <yourpassword> seta g_speed 400 <~ example, this will set the game speed without having to go out of the game and set it form the rcon console. NOTE<THE RCON CONSOLE IS THE BLUE SCREEN THAT WILL POP UP WHEN YOU START YOUR SERVER!> The next thing I do want to mention is the seta bot_enable!> You will need to set this to 1 in order to run bots in your server. A NOTE!> REMEMBER TO SAVE EVERYTHING AFTER COMPLETION! 1 more thing I wanted to add, if you scroll down to the bottom of the window above you will see a map rotation. The maps you see in the rotation are default maps, you can change the map rotation either by notepad or you can get Quake 3 Runner which is great for creating map rotations, Quake 3 Runner can be found at the bottom of the MODS page!
You can find more at the beryllium site itself This is the Beryllium site. It has all of the stuff you will need to further learn to working with the beryllium.cfg
NOW the way I zipped the beryllium mod, I included the files that I am using, so if you follow these instructions pretty closly you should be about ready to start your server. OK NOW go to the BAT file that is in your Quake 3 Arena folder. Its the little file with the gear on it, DOUBLE CLICK on it and it should start the server. You can either go into the game and search locally for your server or do a multiplayer scan <depending on what you set your server for as far as dedicated goes>
AS far as wanting to run any other MOD out there you can do so by following this basic setup for MODS, You can find more MODS in my MODS page here at psychossite or you can do a google search for quake 3 arena mods, there's also a link in the MODS page for mods at planetquak3.net.
If you have ANY questions you can EMAIL me and I'll help ya out the best I can, Enjoy your server and most of all HAVE FUN !
Also you can get a full list of RCON COMMANDS <here
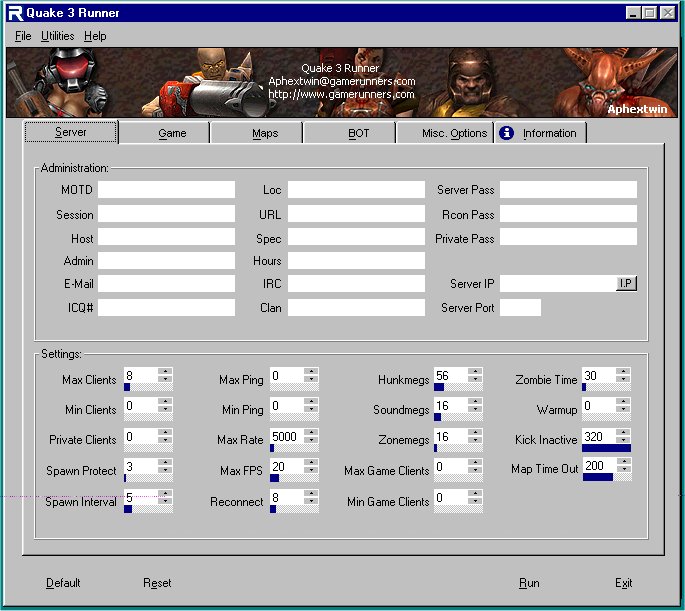
SERVER TOOLS Here is acouple of programs to help you execute and rcon your server. -- Quake 3 Runner -- This here is a ALL in 1 setup program for setting up a server .. You can add your custom mods and whathaveya .. ALSO this program makes creating a MAP.CFG a breeze ! No more having to type out on a notepad ! Quake3Runner.exe <!> DOWNLOAD HERE <Click Image To enlarge>
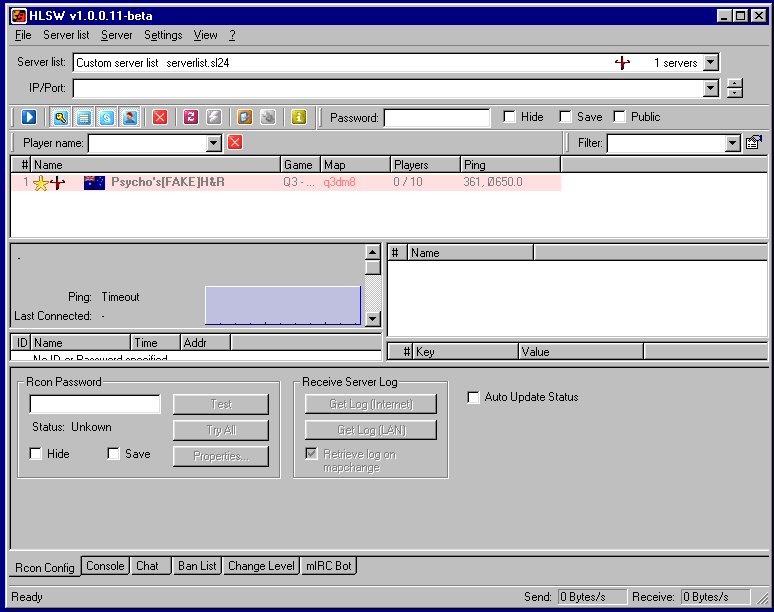
hlsw_1_0_0_11-beta This Program is for remote consoling your server, you can kick,ban,adjust settings, and more. It also works with alot of other games, included in this program is IRC chat to chat with your friends! <Click Image To enlarge> <Download HERE> NEED HELP WITH IT? See the tutorial
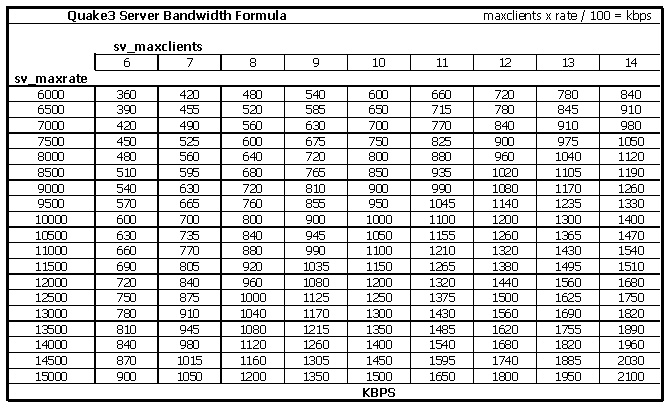
Here's a chart of maxrates for your server. So you can make things smooth for every1.
|